HTC Anemometer, AVM-07

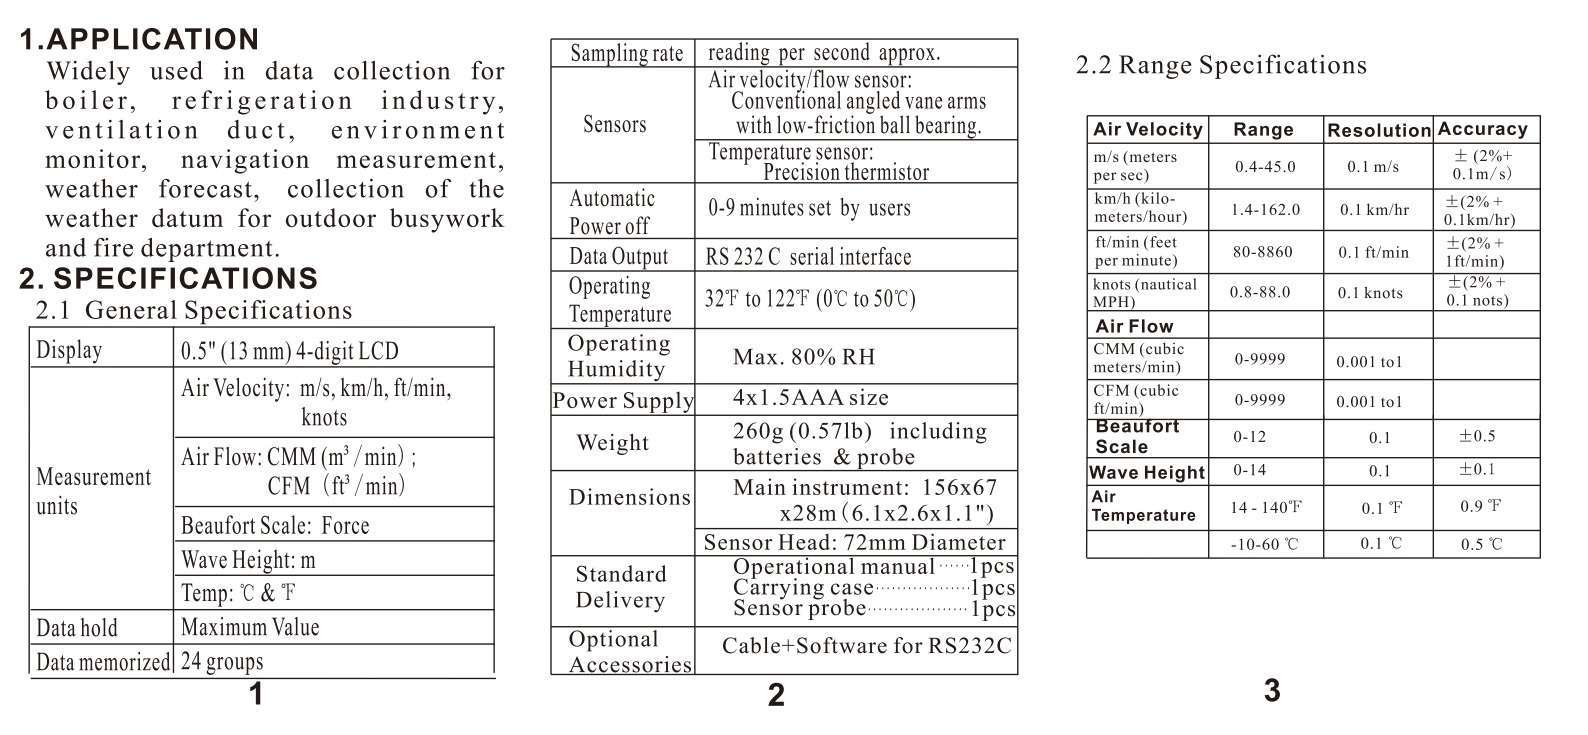
  • 0.5” (13mm) 4Digit Display
  • Data Hold
  • Data Memory : 24 groups
  • Auto Power Off (APO)
  • Optional RS-232 Communication (Advanced Software Program for all windows)
  • Backlight LCD

Power : AAA 1.5v x 4

Standard Accessories : Sensor Probe, Hard Carrying Case, Manual

Optical Accessories : HTC Software with RS-232 USB Cable

Dimension : 156(H) x 67(W) x 28(D)mm Sensor Head -72mm Dia

10 People watching this product now!
  • Pick up from the paykars Store

To pick up today

Free

  • Courier delivery

Our courier will deliver to the specified address

2-3 Days

Free

  • DHL Courier delivery

DHL courier will deliver to the specified address

2-3 Days

Free

  • Warranty 1 year
  • Free 30-Day returns

Payment Methods:

Description

MULTI FUNCTIONAL ΑΝΕΜΟΜETER

This Anemometer is small in size, light in weight, easy to carry. Although complex and advanced, it is convenient to use and operate. Its ruggedness will allow many years of use if proper operating techniques are followed. Please read the following instructions carefully and always keep this manual within easy reach.

4.OPERATION

Turn on the meter using the Power button before taking measurements.
4.1 Air Velocity Measurements
a. Select velocity function using the
FUNCTION button. The LCD will display Speed when the velocity mode is selected.
b. Select the desired air velocity units.
using the UNIT button. The LCD will reflect the current unit selection (ft/min, km/h, m/s or knots).
c. Place the sensor in the air current with the yellow dot side of the vane facing the air flow (see Fig.3)
d. Air velocity will be displayed on the upper line of the LCD.
4.2 Air Flow Measurements (CMM/CFM)
a. Select flow function using the
FUNCTION button. The LCD will display Flow when the flow mode is selected.
b. Select the desired air flow units. using the UNIT button. The LCD will reflect the current unit selection (m³/min, ft³/min). c. Airflow is based on the specific dimensions of the duct being measured. For the meter to correctly measure CMM (Cubic Meter per minute m/min) or CFM (Cubic Feet per minute ft /min). the user must input the area of the Failing to input the correct area dimensions will result in erroneous readings. To input the area dimension,
c.1 just press and hold the DEL/MENU key long enough until ‘Area’ showing on the display, then release it immediately. It takes about 8 seconds from depressing the DEL/MENU key.
c. 2 The previously stored area value will be displayed on the LCD. Please use UP or DOWN key to change the area value to the correct. area dimensions. The longer you press the UP or DOWN key, the larger the increment of the value changes. To quit, just press any key except the UP or DOWN key. This procedure can be carried out whenever required as each time the area of the duct is changed.
d. Place the vane in the air flow (Fig.3). Wait approximately 2 seconds for a stabilized Air Flow reading. The equation below is used to calculate Air Flow:
AIR FLOW(AIR VELOCITY) x(AREA) 4.3 Beaufort Scale Measurements
a. Select Beaufort scale function. using the FUNCTION button. The LCD will display B.Scale when the flow mode is selected.
b. Place the sensor in the air current with the yellow dot side of the vane facing the air flow (see Fig.3)
c. Beaufort force or scale will be displayed on the LCD.
4.4 Wave Height Measurements
a. Select Wave function using the FUNCTION button. The LCD will display Wave when the wave mode is selected.
b. Place the sensor in the air current with the yellow dot side of the vane facing the air flow (see Fig.3)
c. Probable Wave Height in the sea will be displayed on the LCD.
4.5 Air temperature Measurements
a. Select Temp function using the FUNCTION button. The LCD will display Temp. when the temperature mode is selected.
b. Select the desired air Temp units. using the UNIT button. The LCD will reflect the current unit selection (C & F),
c. Place the sensor in the air current.
d. Temperature will be displayed on the LCD.
4.6 Data Hold Feature. While taking measurements, press the MAX button to hold the Maximum reading. The max indicator will appear on the LCD when the display is in Maximum Data Hold mode. Press HOLD again to return to normal operation.

5.STORING AND RECALLING READINGS

5.1 When in ‘M’ state, you can save the reading together with measuring conditions to the memory of the meter by pressing the UP/SAVE key. Then the icon ‘M’ changes to ‘M’ automatically while 10 the number of memorized readings increases 1.
5.2 No matter in M state or ‘M’ state, the memorized data can be browsed by depressing the READ key. The browsing state is marked. in ‘R’ on display. When in ‘R’ state, all the readings memorized can be recalled by depressing the UP key or DOWN key.
5.3 To delete the memorized value in memory, just enter the browsing state and locate the reading to be deleted by the UP key or DOWN key, then depress the DEL key and release it immediately. If there is. an “Erro” on the display, it indicates there is no reading to
delete any more.

6. HOW TO SET THE TIME OF AUTO POWER OFF

The default setting for auto power off at the factory is 5 minutes. That means the meter will auto power off 5 minutes from the time of last key operation. Users can change it to any value between 1-9 minutes by following steps.
6.1 Just press and hold the DEL/MENU key long enough till ‘AUTO showing the DEL/MENU key. Note: Ar is initially displayed but ignore this. And keep holding the button till ‘AUTO is displayed.)
6.2 The previously set value will be displayed on the LCD. Please use UP or DOWN key to change the value to the correct time from 1 to 9 minutes as desired. To disable the function of auto power off. just preset the time to 0. That is, the meter can only be shut down manually in such a case.
6.3 To quit the setting, just press any 12 key except the UP or DOWN key. This procedure can be carried out whenever required as each time to change the time of auto power off.

7.BATTERY REPLACEMENT

7.1 When battery voltage less than approx. 5v. it is necessary to
replace the batteries.
7.2 Install a the batteries 4×1.5v AAA (UM-4) correctly into the case.
7.3 If the instrument is not to be used for any extended period, remove batteries.

Customer Reviews

0 reviews
0
0
0
0
0

There are no reviews yet.

Be the first to review “HTC Anemometer, AVM-07”

Your email address will not be published. Required fields are marked *

1 2 3 4 5
1 2 3 4 5
1 2 3 4 5